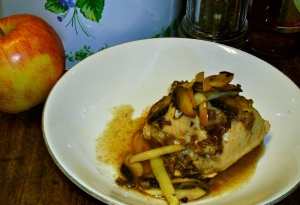
Stuffed chicken breasts

Besides being literally and physically restorative, I find food to be good for the soul. The act of preparing something delicious, and subsequently eating the fruit of that effort, is extremely therapeutic.

Which is why, after a long, difficult day, I cook.

Sometimes, I’ll admit, the product of whatever is available in the fridge — because, honestly, who wants to go grocery shopping after a bad day? — is a little odd, and sometimes it turns out great. This, obviously, is the latter.

In my fridge that night was one lonely chicken breast, a regular old button mushroom and a carrot. The apples on the tree outside, too, were beginning to ripen, so I took one of those. The mushroom was pretty big, so I sliced half of it and diced the rest finely. Part of the apple, too, got diced, and the rest cut into strips, just slightly too thick to be julienned. The carrot got diced, too.

The sliced mushrooms went into the pan first, browning before being removed to make room for the apple strips, which also got browned. Then out went the apples, and in went the diced carrot. The diced apple went in next, while the mushroom and a little minced garlic were the last to join the sautéeing party while I pounded the chicken breast thin.

When the veggies were done, they got scooped into the middle of the flattened chicken, which I then rolled up around the veg mix and sprinkled with flower. Once browned in the pan, I let it simmer to a finish in a quick pan sauce of some apple juice and a dash of cooking sherry.

And it was delicious, the whole thing. I tried it again another night, substituting diced sweet potato for the carrot, and that was also awesome. Also awesome was I really only had to wash one pan, one knife and the cutting board, because after a long day, the last thing you want to do is a sinkful of dishes.

Stuffed Chicken Breasts
1 chicken breast for each serving
1 small carrot or 1/3 small sweet potato each
1 small apple, preferably firm and flavorful, each
1 medium to large mushroom each
minced garlic, opt., to taste
1 T. fresh minced herbs (rosemary, sage, basil and thyme all go well with chicken and fruity flavors), opt.
1/4 to 1/2 cup all-natural, no sugar added apple juice each
2 Tablespoons or so sherry or fruity white wine
salt and pepper, to taste
olive oil
flour for dusting

Dice carrot or sweet potato, 1/3 to half of the apple and half of the mushroom finely. Mince garlic, if desired. Slice remainder of mushroom and apples. Between two sheets of wax paper, flatten chicken breast (using meat tenderizer or rolling pin) to about 1/4-inch thickness.

Brown sliced mushrooms in olive oil in hot pan, making sure not to crowd them. When browned, remove from pan and brown apple sticks or slices. Remove from pan and sautée carrots or sweet potatoes. When they begin to soften, add diced apples. After 1 to 2 minutes, add mushrooms and garlic. Crackle with a little pepper and salt, and whatever herbs you are using. After another minute or two, when mixture is aromatic and everything is tender, remove from heat and transfer veg mix to center of flattened chicken. Roll chicken around mixture, securing with toothpicks. Toss lightly with flour. Adding more olive oil, brown chicken in pan. When browned, add juice, wine and more olive oil, salt, etc, to taste if necessary. Reduce heat and let chicken simmer. Chicken is done when juices run clear. If pan sauce becomes too thick or evaporates, add more juice and wine in approximately the same proportions; if too runny, thicken with flour or cornstarch or let reduce in pan. Serve chicken with sauce and garnish with browned apples and mushrooms.

Leave a comment

Filed under Home garden, seasonal

Mushroom Galette

I am some times frustrated with the types of vegetarian food I see around me. Fake meats, tofu masquerading as steak. It almost feels like an insult to vegetarianism. If we are giving up meat because for our various reasons, why are we pretending other things are meat?

During my early days of frustrated vegetarianism I was introduced to the Tessajara cookbook. A cook book from the Tessajara zen center in California, all the recipes are vegetarian or vegan and use vegetables in their natural form to create meals. No tofurky meatless balls or phish sticks.

I have taken refuge in the various Tessajara cookbooks through out the past two years, always excited by the refreshing qualities in the recipes and the way my body feels when I am done eating.

While searching through a new Tessajara cookbook I came across a recipe for mushroom galette. I haven’t made pastry dough in a while but became excited by the challenge. It ended up not being as challenging as I had thought it was going to be. The use of a pastry cutter attachment on the Bosch mixer was key, as well as pastry flour.

The mixture of robust cheeses, mushrooms, spinach, and onion was a great combination of flavors for a savory pastry. I paired it with a winter squash soup and pumpkin pave bars for dessert.

Don’t let the two part recipe scare you away from this recipe, it really is magnificent.

Yeast Tart Dough

I teaspoon dry yeast

pinch of sugar

¼ cup water

1 ¼ cup flour, divided

½ t salt

1 large egg

3 tablespoons soft butter

-Dissolve the yeast and sugar in warm water (around 98 degrees), let sit for 10 minutes.

-combine 1 cup flour with salt. Make a well and pour in the egg and mix. Add butter and yeast mixture, stir together.

-When combined, turn out onto the counter and knead with remaining ¼ cup flour for about five minutes.

-Put dough in an oiled bowl and let rise for 1 hour till doubled in size. Punch down and let rise for another 30 minutes.

Mushroom Galette

1 cup chopped onion

3 cups sliced fresh mushrooms

1 tablespoon herb de province

1 teaspoon salt

½ cup white or red wine (whichever you have handy really)

1 bunch hardy greens (swiss chard, arugula, or spinich work)

4 Tablespoons Bleu or goat cheese

4 Tablespoons Gorgonzola

2 Tablespoons grated parmesian

-Preheat the over to 425 F. Saute onions till translucent. Add mushrooms, herb de province and salt. Cook for 15 minute then add the wine and cook till mushrooms are caramelized.

-While mushrooms are cooking, steam the greens until wilted and put in a colander to drain.

-Roll out pastry dough on a lightly floured surface into a circular shape. when dough roughly 10 inches across drape the dough over a well oiled cake tin so the dough fits the bottom of the tin and the rest is draped over the sides. Sprinkle the Parmesan in the middle of the dough.

-Squeeze excess water out of the greens toss with the mushrooms and cheese. when combined, place the mushroom mixture in the middle of the dough, spreading it out evenly around the dough. Fold up the sides to form a galette shape. This might require overlapping the dough a little bit, that is OK.

-Bake galette at 425 for 15 minutes, then turn oven down to 350 F for another 25 minutes. It is done when the crust is brown and the insides are bubbling.

Leave a comment

Filed under Vegetarian

Springtime fresh

I love spring. Not only is the bitter winter over, making the great outdoors once again friendly to the casual athlete whose workouts had been stymied by snow and frigid winds, but as the earth awakes it teems with life, bringing forth flowers, leaves and fresh produce.

Asparagus is one of the great early veggies in season during the spring months. We used to grow asparagus even in the heavy, alkaline soil of Tooele County, and it was always fun to see the tender green spears shoot from the ground. The vegetable, a distant relative of the lily, has historically been a popular veg, depicted in paintings from the early Egyptians. Its longstanding popularity is largely due to its high nutritional content (including calcium, magnesium, zinc, vitamins A, B6, C, E and K, fiber, protein, iron — the list goes on and on) and, yes, diuretic properties.

One thing that always bugged me about asparagus was breaking off so much of the end, because they tend to be woodier and less edible than the rest of the shoot. It always seemed like a waste to me, and food waste really sucks. Then I came upon this recipe. Boil the tough ends until tender, then drain, put in a blender with a little of the water, some lemon juice and a bit of olive oil, pulse and serve over pasta. With the linguine I had also sautéed shrimp, a little garlic and the rest of the asparagus, and the flavors loved each other very much. While it’s not going to replace tomatoes as the go-to base for pasta sauces, it was fresh and springy — just as asparagus should be.

ASPARAGUS SAUCE
ends from 1 lb. asparagus
zest and juice from one lemon
2 – 4 T. extra virgin olive oil
1/2 c. water
salt and pepper

Boil ends until soft. Drain water, reserving 1/2 c., and blend ends, juice and some olive oil and water. Start with a small amount, just enough to allow the mixture to purée, and add until desired consistency. Return to stove to reheat as needed, seasoning with salt, pepper, zest and olive oil to taste. Correct consistency by allowing some liquid to evaporate, or by adding liquid as needed. Serve over pasta.

Serves about 4.

Leave a comment

Filed under Home garden, seasonal

Becoming vegetarian

Being an avid vegetarian, I am always interested in hearing peoples stories about why they switched to a vegetarian diet. My ears often perk up a little bit more when I hear about people in their late 40’s and early 50’s becoming vegetarians.

At the beginning of the year, a former professor of mine, Mike Sweeney, posted on facebook about making a recent switch to a vegetarian diet. I posted an encouraging comment and didn’t think much about his switch till I saw him posting more and more about his weight loss and overall positive attitude about being vegetarian.

I recently interviewed his wife, Carolyn Sweeney, who Mike credits as being a newfound gourmet chef.

“Just for the record, I have never liked to cook,” Carolyn wrote in an e-mail interview,  “and that’s perhaps the thing I like best about vegetarian cooking. It’s easier.”

The recent change, which came at the beginning of this year, was due to a number of factors, or the stars and planets aligning, as Carolyn said.

Carolyn said her son and daughter-in-law were very influential to making the switch from omnivore to vegetarian. The Sweeneys’ daughter-in-law, Angela Sweeney, was not eating meat during Advent, and their son, Dave, took the meat-free pledge after reading Jonathan Safran Foer’s Eating Animals.

“Both were eating at our house while packing their belongings for a cross-country move, so we were making a lot of macaroni and cheese and vegetarian soups. We were cooking at home more than dining out for a change because Angie loves to cook and it was fun to share the quality time in the kitchen with her before the move.”

Already interested in vegetarianism, the decision to go meat-free was further spurred by a trip to the doctor.

 “Shortly after the kids moved, Mike’s doctor told him he was likely on the road to diabetes if he didn’t lose weight. He recommended a Mediterranean diet. That was the biggest thing. Once Mike’s willpower kicked in, there was no going back,” Carolyb said. “Eating Mediterranean was the perfect recommendation because, no matter what the food is, if it has enough spices, we’ll eat it.”

Carolyn said that she and Mike won’t be giving up cheese any time soon but she does miss chicken and burgers.

 “I can trace our tracks across America by the great burger joints we’ve frequented.” Carolyn said “ And I’m sure I’ll have to circumvent the Runza Drive-Ins the next time we’re in Nebraska.”

The Sweeneys plan on being vegetarian long term, citing the benefits, most notably a 20-pound weight loss on Mike, as the biggest motivator for their diet change.

“It’s a done deal,” Carolyn said. “Mike and I really don’t miss the meat, and the benefits are far too great to go back. We are so-o-o-o-o looking forward to the market’s tomatoes and berries this year!”

Carolyn said she has not yet cooked with fake meat and uses mostly egg plant, zucchini and beans in her cooking, but notes that there are few vegetables she and Mike don’t rely on in their diet.

For people who are thinking about becoming vegetarian or are in the process of becoming vegetarian, Carolyn recommends getting a copy of 1,000 Vegetarian Recipes by Carol Gelles, Mediterranean Vegetarian Cooking by Paola Gavin and www.vegweb.com

Carolyn’s advice is simple:  just go for it. For people who are considering becoming a vegetarian,  “There are so many delicious options out there!” Carolyn said. “ And, if you’re lazy like me, consider buying a manual vegetable chopper and an easily cleaned garlic press on Amazon.”

With no favorite recipes as of yet, Carolyn did recommend the super fast chickpeas and spinach from vegweb because it can be made using canned chickpeas. She does, however, recommends lessening the spice, since a tablespoon was a little strong.

Leave a comment

Filed under Check this out, Uncategorized, vegan, Vegetarian

Because everything is better sweet, including potatoes

Ah, the sweet potato. Not the yam, which is a common misnomer for the sweet potato and actually its own root native to Africa and Asia, but the distant, orange relative to the humble tuber.

I love sweet potatoes. They’re great at the holidays, though you will never see a marshmallow anywhere near my sweet potatoes, but I love them any time of year. They’re a great winter vegetable, and, though the calendar says it is March, Mother Nature insists we’re solidly in that frozen season.

My mom has long told me about getting roasted sweet potatoes from street vendors in Japan. Until recently being more familiar with the root boiled and mashed I couldn’t see how there could be enough flavor to make a satisfying solo dish. Turns out, the cooking method makes a big difference.

Roasting the noble sweet potato enhances its earthy comfort and carmelizes its natural sugars. Instead of roasting whole, which can be a daunting vegetable for the timid, I like cutting them into wedges, like oven fries, which also dries out the exterior as a contrast for the moist sweet potato mush within. Sprinkling some sea salt over top with a little ground pepper adds a depth of flavors as the sweet and the savory work together to make a healthy, all-natural nirvana.

Sweet Potato Oven Fries

1 lb. sweet potatoes, peeeld if desired, cut into thin wedges

3 to 5 T. olive oil

2 t. sea salt

1 t. fresh ground pepper

On a lined jellyroll pan (or comparable baking dish) spread 1 to 2 T. olive oil. Arrange wedges in a single layer; drizzle with rest of olive oil, then sprinkle with salt and pepper. Bake in a 400 degree oven for 20 minutes or until tender. Serve hot and dominate.

Leave a comment

Filed under Holiday food, vegan, Vegetarian

Goat Cheese and Beets

pickled beets and goat cheese have a winter appeal. Cracking open a jar of home pickled beets from the root cellar and whipping up goat cheese mousse feels like part of a cozy winter meal.

Sunday dinners are the nights of experimentation in my house. Last Sunday was Tapas night. A  meal of appetizers, essentially. I recently found this dish at restaurant that I like, but it is over priced so naturally I want to make it myself. After meeting the chef of the restaurant this dish is from,on a chance encounter, I inquired about the goat cheese mousse dish. I told him what I thought was in it and he told me I was right. “Just add cream cheese”, he told me, ” That is the secret.”

Recipe cracked and now shared.

Goat Cheese and Beet Tortillas

This dish works great as part of a Tapas array of

foods or as a side dish. Don’t be threatened by the words “goat cheese mousse” it really isn’t as daunting as it sounds. It is simple to make and the excess can be used with toast, eggs, or whatever you want.

Goat Cheese Mousse With Beets and Tortillas

equal parts of goat cheese and cream cheese (I used 1 lbs of goat cheese so I used 1 lbs of cream cheese)

– 2-4 Tablespoons milk

– 1 jar pickled beets (any variety)

– 1 jar apricot or pear chutney

-1 package Tostada torillas or a thick, good sized corn chip

-1 spring salad greens or arugula

Take room temperature goat cheese and cream cheese, combine in a stand mixer, adding the milk one Tablespoon at a time while mixer is running on a low setting for 3-5 minutes.  Cheese may clump together at first, don’t panic. As the blades turn the friction will heat up the cheese, this will fix the problem unless you cheese is not at room temperature.

Mousse is ready when it is airy, creamy, and forms soft peaks. Set the mousse aside.

Drain the beets from their juice and cut into chunks. set aside.

When you are ready to assemble your goat cheese tortillas take the tostadas, or corn chips one at a time and spread, in the order; a think layer of chutney on the bottom, followed by a medium heap of goat cheese spread around the tortilla, followed by a smattering of beets and greens to top it off.

Enjoy and dominate frequently.

Leave a comment

Filed under Check this out, Things involving cheese, Vegetarian

Bittman’s Bread: An Ode to the Minimalist

In last Wednesday’s column Mark Bittman announced an end to his 13-year weekly contribution of home cook-friendly tips and recipes. Total bummer. That was, like, the best part of my Wednesday.

Bittman’s columns were all about the ease and feasibility of healthy, sustainable, delicious cooking and enjoyable eating. A short video often accompanied the recipe so cooks who were perhaps unfamiliar with a certain technique or unsure of the actions described in the method could see him make the whole thing, start to finish. His book published last September, Food Matters, was a sustainable-eating companion to his 2008 book, How To Cook Everything. Both offer simplified but quality recipes to help even the busiest people make tasty, healthful dishes.

So, as my tribute and farewell to the weekly column I enjoyed so much, here is Bittman’s easiest recipe of them all, which isn’t even his. It’s on his list if his 25 favorites, which I highly recommend (also check out his video collection). Knead-less bread. Seriously. You mix the ingredients, let it sit for most of a day and let nature do its thing. When you finally bake it, you get some pretty fine artisan bread, moist and spongy on the outside with a crust that is both crisp and chewy at once. I made it yesterday, and it is every bit as easy as it sounds.

No-Knead Bread

3 c. all-purpose or bread flour, plus more for dusting

1/4 t. yeast

1-1/4 t. salt

1 5/8 c. water

cornmeal or wheat bran

Mix dry ingredients in a large bowl, then add water. When mixed dough should be very sticky. Cover with plastic wrap or damp towels. Let dough rise in a warm room for at least 12 hours (I let mine go almost 18) until surface of dough is bubbly. Turn onto floured surface and fold a couple of times to form a round loaf-ish looking thing. Place seam-side down on a towel liberally dusted with cornmeal or wheat bran. Let rise another 2 hours or so, until dough springs back to the touch.

Meanwhile, at least 45 minutes before dough is done rising in the cornmeal/wheat bran towel heat oven to 450º, heating inside a large (6- to 8-quart, Bittman says), heavy covered pot, such as Le Creuset, Pyrex, cast iron or Corning Ware. When dough is ready, pour into hot pot, shaking if it lands unevenly, and bake*, covered for 30 minutes. Remove lid and bake uncovered for another 15-30 minutes.

Turn onto cooling rack; let rest. Enjoy, when cool, with good butter, jam or expensive cheese.

*At this point, I turned my oven down to about 350º and baked a little longer to compensate, resulting in more moisture inside.

Leave a comment

Filed under Check this out, Uncategorized, Vegetarian

Pink Banana Squash Soup

At the last Logan farmers market I was picking through boxes of squash, trying to find a good variety to last me through the winter when a woman asked me, “So, what do you do with all the squash you are getting?”

“What do you mean?” I inquired of her.

“Well, I always use mine for decoration. Can you eat them?”

I came up with this recipe after much contemplation on what kind of soup to make with my one and only banana squash.  It’s naturally thin skin makes it less hearty than the rest of it’s winter relatives  but it has lasted a long time in my root cellar despite it’s reputation for poor winter performance.

Instead of using boxed broth from the store I opted for a cheaper alternative that is vegan and gluten free, Edward & Sons Garden Veggie broth cubes. A box of these cubes is the same price as one quart of veggie broth. I am usually apprehensive about using cubed bouillon because of all the MSG they are pumped full of, but these are MSG free and go a long way.

In reality, you can make this soup with any kind of squash if you really want to, but the pink banana’s flavor is the pinnacle of this soup. It’s flavor is unmatched by the more popular butternut squash and pairs well with a crusty bread and a soft cheese like Brie, Port Salut, or a Chevrie goat cheese. A ham and brie grilled cheese also goes nicely.

Soup paired with whole wheat artisan bread and Chevrie goat cheese. Photo by Milo Jensen

With five ingredients

(excluding the spices)

this soup is easy to make and is done in 45 minutes.


Pink Banana Squash Soup

1 foot long pink banana squash peeled and cut into one inch cubes

2 Edward & Sons Garden Veggie broth cubes

5 cups of water

3 large shallots diced

4 cloves of garlic minced

1 Tablespoon olive oil

1 large soup pot or dutch oven

5 sage leaves

1 teaspoon parsley

toasted pumpkin seeds for garnish (optional)

– With the stove turned to a medium high heat, add oil to pot. When oil is shimmery and lucid, add garlic and shallots.  saute until shallots are pliable and garlic starts to brown a little, then add the cut pieces of squash.

– Saute squash for five minutes, add five cups of water, bouillon cubes,  sage leaves, parsley and pepper. mix well to insure the bouillon cubes incorporate into the soup and don’t sit at the bottom of the pot.

– Boil soup for half an hour or until the squash is tender all the way through.

– Remove from heat and allow to cool for a few minutes before transferring the squash pieces  and broth to a blender. Blend till smooth.

– Garnish with toasted pumpkin seeds and serve hot.

C.Ann

Leave a comment

Filed under soup, vegan, Vegetarian

Nutella Corn flakes

I really am the health crazed fool I profess to be. I need to say that before people begin to think that I have given up my ways of eating kale, beats, and whole grains.  Some times I get a weird food kick and have to follow it. My latest food kick led me to Nutella covered corn flakes.

As a child in Japan, we use to get chocolate covered corn flakes at the supermarket as a treat every once in a while. I remember them being so delicious and chocolaty, but not in the waxing American chocolate way. When I moved back to the United States for college, I occasionally found myself craving chocolate corn flakes, something that is impossible to find anywhere in Utah. A year ago, while working at a bakery, the pastry chef  (who happens to be Japanese) was preparing for a chocolate festival and made chocolate covered corn flakes to go with a piece she created. Making Nutella covered corn flakes has been on my mind since and I had to see if I could really make them at home.

If you are wondering what use you have for chocolate covered corn flakes, know that the uses for them are endless. Eat them like cereal with your favorite milk product, use them on top of ice cream sundaes (don’t knock it till you’ve tried it) or eat them alone.

I used Kelloggs corn flakes since they are a bit thicker than the generic brand and tend to hold up better. Be sure to use the Nutella brand hazelnut chocolate spread, or a higher grade of hazelnut chocolate spread, and not the Kroger brand.  Kroger brand is not as good as the real deal.

Nutella covered corn flakes

1 box corn flakes

1 jar Nutella hazelnut spread

1 large mixing bowl

Glass liquid measuring cup (or a measuring cup as equally microwave safe. This does not include plastic)

spatula

plastic container for storage

– Measure one cup of  Nutella in the liquid measuring cup. Microwave in 30 second increments till it takes on a liquid texture and is warm. This can also be done in a double boiler to avoid burning the Nutella.

-Pour approximately half the bag of corn flakes in the large mixing bowl and begin mixing the Nutella in by pouring the Nutella, in a circular motion, over the corn flakes.

– Begin to gingerly mix the Nutella into the corn flakes using the spatula and your free hand. Whatever you do, don’t go into hulk smash mode with the corn flakes. Use a little bit of force to turn the corn flakes for optimum Nutella coverage, don’t go crazy.

– When corn flakes have reached a desired stage in chocolate coating, transfer them to a container for storage. Keep in the refrigerator for optimum crispy flakes.

In case you are worried that is is what I spent my weekend doing, know that I made four loaves of artisan bread, Moroccan couscous, a vegan chocolate mousse pie, and a slew of other things. Don’t give up on me yet….

2 Comments

Filed under chocolate

Peppermint Bark, just in time for the office party

Last week our office had its annual Christmas bash. Sweetly catered by Sostanza  (the restaurant responsible for that pastry shop I mentioned earlier), dinner was thick cuts of tender roast beef, buttery au grautin mashed potatoes, steamed sqash aud beans, salad with a scratch raspberry vinaigette, that kind of thing. I’m told it’s a far cry from last year’s grocery store fried chicken.

Anyway, I find out at the last minute that I’m supposed to bring a dessert. All I could do is make…a trip to Albertson’s for some boxed cookies. I know. It killed me, too.

Determined not to let that unfortunate incident happen again, I went home and made a go-to recipe for the next surprise potluck. Peppermint bark is simple, tasty and can be made in the office microwave if you really get desperate and don’t have time to go home and cook.

PEPPERMINT BARK

1 lb. good white chocolate (I used Callabeau snaps, but something like Guittard white chips would work)

box candy canes, crushed

1 T. or so peppermint extract, opt

In a double-boiler, or microwave-safe bowl, heat the chocolate until it just starts to melt. Stir to melt the rest, heating as needed. Just be careful to not overheat or you will get candy cane frosting. When smooth, mix in peppermint extract and candy cane bits until it’s pretty stiff and chunky, for lack of better adjectives. Spread out on a jelly roll pan, or paper plates, covered with wax paper or plastic wrap; let cool. Break into bits, serve and let everyone think it took you hours to make.

Leave a comment

Filed under Uncategorized